A Glass Bird (How I Built Wren v0.1.0 on Windows)
Preface
I have travelled far since we last met. I have slain ancient pythons, dug deep into cavernous compiler code, and walked the whole length of the environment PATH, but finally, I return. Behold!
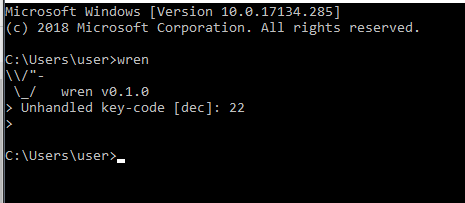
That’s the wren compiler. Running in Command Prompt. My goodness.
Getting ahold of this elusive executable was an experience. I’m not going to claim it was pleasant or easy. Heck, I’ve been whining about how difficult this has been for around six months now. But that doesn’t matter to me any more. The point is that it’s over (well, at least until the next major release version, anyway) and I couldn’t have done it alone.
Credits
Before we begin, I’d like to thank _discovery, springogeek, minirop and especially emokoi on the (un)official Wren Programming Language Discord server, who helped me out when I got stuck and generally guided me through the process.
You guys are the greatest!
Oh, and Bob. Wouldn’t have any of this without Bob.
So first off, if you’re not interested in how I (technically we) did it, there you go. That zip file should contain all the things you need for wren development on a Windows computer, including the source code, command line interface and static binaries. I’d really hope that the website starts handing out stable releases on its own, but since the language is in such heavy development right now, I can see why it might not be practical.
Why is it So Hard (Right Now)?
Simply put, there aren’t enough Windows users in the Wren community. At least in my opinion.
Sure, it may technically run on Windows, but the official build chain is that of Linux. This isn’t that surprising. I’m not blaming anyone here. I’ve been meaning to make the switch myself, and the fact that it supports Windows at all is much appreciated. It’s just that wren’s biggest core contributor physically can’t test how wren performs on Windows, and others that can don’t appear to have written much of it down (not that they have to, of course).
Leading to experiences like mine where I had to jump through dozens of hoops, scouring the internet and bothering people before I finally reached a stage where I can both access all the proper tools and understand how they work.
Now that I am there, I think it’s high time that I explain myself…
…The Virtual Machine
So like the documentation says,
there isn’t really any need to compile Wren
separately. Just take all the files from the vm folder, dump them in your
project and they should work regardless of your compiler so long as you
remember to both flag them and include the necessary header files.
But if for whatever reason you don’t want complex compiler code laying around,
you can compile it as a library and add that to the linker instead.
You might be tempted to type make vm into the command prompt and cross your
fingers, but there’s a high chance that this won’t work. From my experience,
either you won’t have any MinGW toolchain installed at all and nothing will
happen, or you’ll get some obscure error that I still don’t understand despite
being able to move past it.
Once you have all the proper packages installed it is possible to do it this
way, just not through the command prompt itself. You’ll just end up with a .a
and .o file that (as far as I know) doesn’t work with Visual Studio or MinGW.
Now it could be that those are just a .dll and .lib in disguise, but I’m
not versed enough in Linux C development to know for sure.
Fortunately, there’s a solution to this. If you head into the wren\util\vs2017
folder, there should be a wren.sln file that you can open in Visual Studio.
Once it’s visible, find the Solution Explorer sub window and right click on the
wren_lib project, then hit Build.
Since the virtual machine itself has no external dependencies, this is relatively
straightforward, and is the best way to obtain the files in Windows overall as
far as I’m concerned. Just make sure that you have the Windows 8.1 SDK
installed. If this is missing, upgrading to the latest version should
work just fine, otherwise you can download it through the Visual Studio Installer
found in the start menu.
…The Command Line Interface
So you might be reading this and wondering what all of the fuss is about. Surely, all you must do is use the same Visual Studio solution to build the other project? Well, that’s where you’re wrong. Try as hard as you like, it won’t work. You see the major problem with the command line interface is that it depends on two major programs for its extended functionality; libuv and Python 2. The documentation does mention this, but how you get a hold of them is left up in the air.
From my attempts, it appears that a Python script is used to build and link
libuv during the Microsoft Build process, but for whatever reason it doesn’t
give the binary. Replacing subprocess.check_call to subprocess.call will
get you somewhere to start with, but it won’t actually give you the proper
output on the account of deleting too many files afterward.
Building libuv separately with Visual Studio through its own solution and linking to that is possible, but from what I’ve seen it just causes more edge cases and errors.
Now Python 2 is easy enough to install, and prebuilt binaries of libuv are available, but getting mvsc to link them is a nightmare and something I so far haven’t been able to do.
Rather, the way you build the command line interface is using a program called
Msys2. Msys2 is a port of the Linux build chain to Windows, including the
ever crucial GNU C compiler and GNU Make. Download the installer and run it,
then run the basic version of msys2.exe, typing the following commands along
the way:
git clone https://github.com/munificent/wren.git # Clone the wren repository
cd wren # Enter its folder
pacman -S mingw-w64-x86_64-gcc # Download all of the necessary packages
pacman -S mingw-w64-x86-gcc-libs
pacman -S mingw-w64-x86_64-libuv
then close Msys2. In the Msys2 installation directory, find the file named
msys2_shell.cmd file and carefully open it in a text editor. If you
accidentally run it, that’s fine, just get the code on the screen. Uncomment
line 16 so that the MSYS2_PATH_TYPE equals inherit. Add the mingw32/bin
and mingw64/bin folders to your environment PATH and run the newly edited
msys2_shell.cmd file to start msys2.exe. You’ll notice that you’ve got
access to all of the things you’d be able to do in command prompt normally.
Then, whilst crossing your toes, fingers, legs and eyes type:
curl http://ix.io/1pAP | git apply -
make # Run the Makefile in the current directory
ls -al # List all directory contents
If you can see a wren.exe and a full bin directory, consider yourself lucky.
Otherwise, check your installed packages and try again. It might be that you
must reinstall some things or verify your PATH. Otherwise, enjoy your new
build tools. Back them up and get to work making things in Wren.
Conclusion
So it’s clear to me that wren’s user experience for Windows developers isn’t optimal at the time of writing. I have a few ideas as to how this might be improved, but nothing concrete. Wren is open source, however, and just because it’s not great now doesn’t mean that it won’t improve in future releases. If I ever come up with a solid solution for Windows users that doesn’t involve a bunch of workarounds, I’ll be sure to share it.
If this guide helped you, all I ask is that you to spread it around. The last thing I’d want is for people to figure this out the hard way…